Installing a Water Softener: Step-by-Step Guide
Transform your Bengaluru home with Crystal Pure Water's guide to installing a whole home water softener. Enjoy softer water and cleaner living!
Transform Your Home Water Quality: Installing a Whole Home Water Softener
Imagine stepping into a shower that feels silky smooth against your skin, with soap lathering up effortlessly. Alternatively, run your dishwasher without worrying about cloudy glassware. A whole house water softener makes it possible to enjoy these everyday luxuries. At Crystal Pure Water, we'll walk you through the simple process of installing one in your Bengaluru home.
Understanding Water Softeners
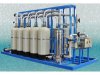
Before we get into installation, let's define what a water softener does. It is a device that removes hardness-causing minerals from your water supply, such as calcium and magnesium. This not only improves water quality, but it also increases the lifespan of your appliances and plumbing.
There are several types of water softeners available, but for the majority of Bengaluru homes, a whole-house system is ideal. It treats water at the point of entry, ensuring that every faucet and appliance has softened water.
Preparing for Installation
Now, let's get started on installing your whole home water softener. Here’s what you'll need:
- Tools and Materials: Wrench, pipe cutter, Teflon tape, and the water softener kit from Crystal Pure Water.
- Choosing the Location: Find a spot near your main water supply where the softener can be easily accessed for maintenance.
- Check Water Hardness: Use a water hardness test kit or rely on Crystal Pure Water’s expert service to assess your water's hardness level.
Installation Steps
Step 1: Turn Off the Water Supply
Locate your main water valve and turn it off to prevent any accidents during installation.
Step 2: Drain the Water System
Open faucets around your home to drain residual water and relieve pressure in the pipes.
Step 3: Install the Bypass Valve
Attach the bypass valve to your water softener. This allows you to redirect water flow when servicing the unit.
Step 4: Connect the Water Softener to Plumbing
Connect the inlet and outlet pipes to the water softener. Use Teflon tape to secure fittings and prevent leaks.
Step 5: Position the Drain Hose
Secure the drain hose according to manufacturer instructions, ensuring proper drainage.
Step 6: Add Salt to the Brine Tank
Depending on your choice (sodium chloride or potassium chloride), fill the brine tank with salt to initiate the softening process.
Step 7: Turn On the Water Supply and Check for Leaks
Gradually turn the water supply back on and inspect all connections for leaks. Tighten fittings if necessary.
Step 8: Set Up the Control Valve
Follow Crystal Pure Water's instructions to program the control valve for your specific water softener model. This establishes the regeneration cycle based on your household's water usage.
Testing and Maintenance
Once installed, test the water to make sure it meets your expectations. Crystal Pure Water recommends carrying out regular maintenance, such as checking salt levels and cleaning the brine tank, to keep your system running smoothly.
Conclusion
Congratulations! You've successfully installed a whole home water softener, thanks to Crystal Pure Water’s easy-to-follow guide. Enjoy the benefits of softened water throughout your Bengaluru home, from cleaner dishes to softer skin.
Visit Crystal Pure Water today for more water quality tips and to learn about our water treatment solutions. Transform your home's water quality with us—it's an investment your family will notice and appreciate every day.
Call to Action
Are you ready to experience the difference that softened water can make?Crystal Pure Water visit - # 41, FF3 Zuheb Complex, M G Palaya Main road HSR layout, 7th Sector, Bommanahalli, Bengaluru, Karnataka 560068 or Contact - 09886006666 today to schedule a consultation and begin reaping the benefits of a whole house water softener in Bengaluru.
Paramount water softener can enhance your home's water quality?